Today I'm going to share my experience redoing the bathroom cabinets with one of the most popular door and trim paints, Benjamin Moore Advance. There are many mixed reviews on this paint but as far as low odor, waterborne alkyds go, I don't think there's anything better at its price point. Loved the result!


It's subtle in the photos but I also repainted the walls BM Litchfield Gray in Regal Select Semi-gloss. This color is a nice modern gray in natural light and a cool beige in artificial light. I might have gone more gray with a color like Pale Oak but there were a lot of gold-toned fixtures already in there. The Regal Select was a joy to work with and completely worth the price. It covered in one coat almost fully with the second coat being an easy touch up layer. I've used Behr, Kelly Moore, and Ben Interior before and when it counts, use BM Regal, or better yet BM Aura, to cut the labor needed in half. Yes, BM Aura is noticeably better than all of the above and easy to brush and roll too.
How do you like the new look?

 |
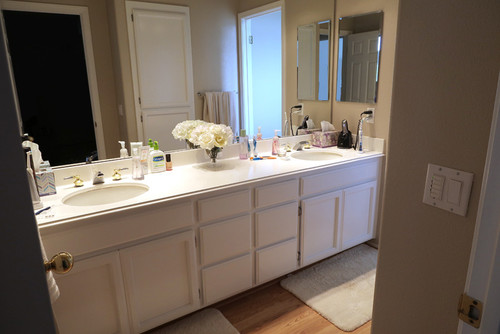
| This is the before: (so excited to paint I already took off some doors 😄) |
BM Advance
Color: Kelly Moore Country Cotton, a match for the existing trim.
Sheen: Semi-gloss. After having painted other cabinets in Satin, I have to say that unless you're sure you like the extra shine of semi-gloss, stick with satin. It's just the right amount of shine for most people.
Before getting to the fun part, surface preparation is a must! I cleaned each door with diluted vinegar, deglossed with Klean Strip, then sanded with 120 grit, and then 220 grit. Since I also was replacing the hinges, I filled in the old holes with Elmer's wood putty. The prep alone took a whole day but paid off in the end.
Before getting to the fun part, surface preparation is a must! I cleaned each door with diluted vinegar, deglossed with Klean Strip, then sanded with 120 grit, and then 220 grit. Since I also was replacing the hinges, I filled in the old holes with Elmer's wood putty. The prep alone took a whole day but paid off in the end.
My cabinets doors were made with a veneered facing, so I didn't have to worry about graining or knots. I primed with two coats of Zinsser 1-2-3 followed by two coats of Advance. If you have solid wood doors, you should use Zinsser Coverstain or BIN. Both of those smell very strong and probably require disposable brushes. When laying on the Advance, remember to start with the backs of the doors so the front of the doors will be drying face up when you're all done.

A few thoughts on Advance:
This paint levels extremely well. As long as the coat is the right thickness, it will make brush strokes disappear. On the other hand, it does like to bubble. We're talking tiny bubbles as you're rolling it on. Most of them will fizz away by themselves as it dries but a few will give an orange peel effect. Surprisingly, using a brush will prevent this air bubble problem but I still recommend using this roller for the face of the door.

After comparing the finish on Advance to other paints, I can say with confidence that the finish with Advance is downright gorgeous. I've noticed it in passing over many months now, and it just has this sophisticated glow about it. Never a gaudy shine. Other paint finishes have not come close.


One of the main advantages that people claimed this paint had over latex paints was the extremely hard finish. I let all the cabinet doors and drawers cure untouched for seven days before reinstalling them, but sadly, I didn't feel that the finish was particularly hard. The instructions on the can say it may take up to a month for it to fully cure. Well, it is now five months later and while it has hardened quite a bit, it is still not as durable as the traditional oil paint in other parts of the house. Chipping did occur especially in the first month, but it has been very minor and easily touched up. Considering the much easier cleanup and extremely low odor however, I would still choose Advance over traditional oil paints.
Another concern about alkyds is the possibility of it yellowing over time. This paint did not yellow during the seven days it was in a garage with zero sunlight. And months later in a bathroom with little natural light, it still looks a crisp white.
 |
| Painting completed! |
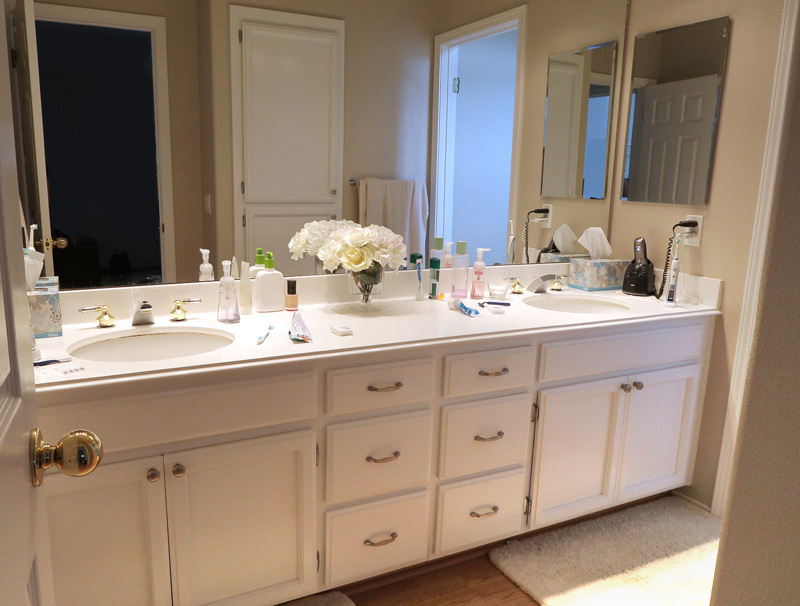 |
| With new hardware |
It's subtle in the photos but I also repainted the walls BM Litchfield Gray in Regal Select Semi-gloss. This color is a nice modern gray in natural light and a cool beige in artificial light. I might have gone more gray with a color like Pale Oak but there were a lot of gold-toned fixtures already in there. The Regal Select was a joy to work with and completely worth the price. It covered in one coat almost fully with the second coat being an easy touch up layer. I've used Behr, Kelly Moore, and Ben Interior before and when it counts, use BM Regal, or better yet BM Aura, to cut the labor needed in half. Yes, BM Aura is noticeably better than all of the above and easy to brush and roll too.
How do you like the new look?
Comments
Post a Comment